Building Production-Ready Payments: Integrating Stripe with Next.js & NestJS
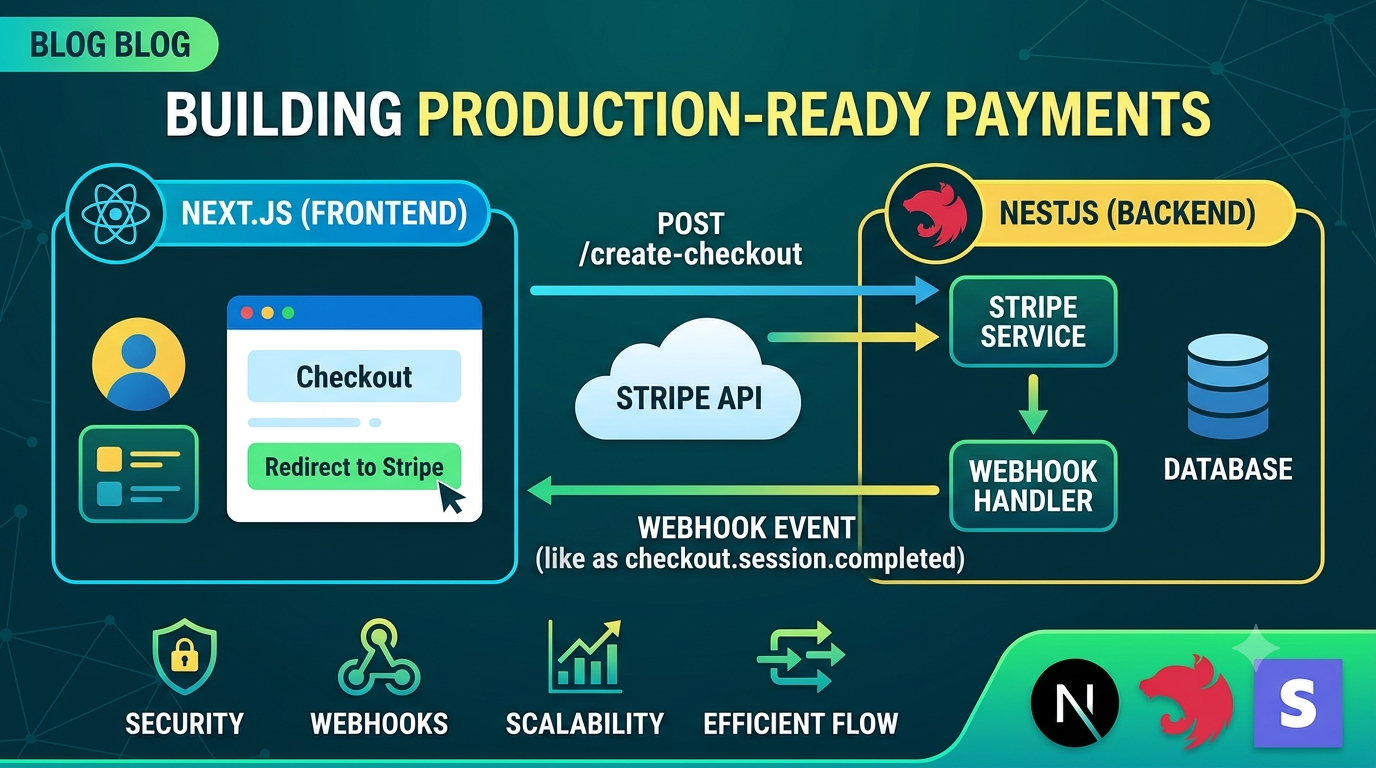
When connecting Stripe across this architecture, keeping responsibilities clean is essential: Next.js manages the UI and user navigation, while NestJS securely interfaces with the Stripe API, manages customer state, and processes asynchronous webhooks.
Here is a full breakdown of how to build a clean, secure Stripe checkout flow using Next.js and NestJS.
1. Architectural Overview
Before writing code, establish clear separation of concerns across your stack:
┌─────────────────┐       1. POST /payments/checkout       ┌─────────────────┐
│                 │ ────────────────────────────────────> │                 │
│  Next.js App    │                                       │   NestJS API    │ ─── 2. Create Session
│  (App Router)   │ <──────────────────────────────────── │    Backend      │     with Stripe API
│                 │        3. Return { url }              └─────────────────┘
└────────┬────────┘                                                ▲
         │                                                         │
         │ 4. Redirect to Stripe Checkout                          │ 6. Async Webhook Event
         ▼                                                         │    (checkout.session.completed)
┌──────────────────────────────────────────────────────────────────┴┐
│                           Stripe Hosted                           │
│                         Checkout / API                            │
└───────────────────────────────────────────────────────────────────┘
Frontend (Next.js): Displays pricing/checkout buttons, triggers checkout requests to NestJS, and handles redirecting the user to Stripe Checkout.
Backend (NestJS): Handles business logic, interacts with stripe Node SDK, validates raw request signatures, and updates database state via Webhooks.
Stripe: Collects payment info securely, processes transactions, and fires webhooks.
2. NestJS Setup: Modules, Services, and Checkout API
Step A: Enable Raw Body Parsing
Stripe webhooks require signature verification against the unparsed raw HTTP body. Enable this in main.ts:
// src/main.ts
import { NestFactory } from '@nestjs/core';
import { AppModule } from './app.module';

async function bootstrap() {
  const app = await NestFactory.create(AppModule, {
    rawBody: true, // Required for Stripe signature verification
  });

  app.enableCors({ origin: 'http://localhost:3000' });
  await app.listen(3001);
}
bootstrap();
Step B: The Stripe Service
Inject the Stripe SDK using NestJS dependency injection or a dynamic module pattern:
// src/stripe/stripe.service.ts
import { Injectable, OnModuleInit } from '@nestjs/common';
import { ConfigService } from '@nestjs/config';
import Stripe from 'stripe';

@Injectable()
export class StripeService implements OnModuleInit {
  private stripe: Stripe;

  constructor(private configService: ConfigService) {}

  onModuleInit() {
    this.stripe = new Stripe(
      this.configService.get<string>('STRIPE_SECRET_KEY')!,
      { apiVersion: '2025-12-15' }
    );
  }

  async createCheckoutSession(priceId: string, userId: string) {
    return this.stripe.checkout.sessions.create({
      payment_method_types: ['card'],
      mode: 'subscription', // or 'payment' for one-time purchases
      line_items: [{ price: priceId, quantity: 1 }],
      client_reference_id: userId,
      success_url: `${process.env.FRONTEND_URL}/success?session_id={CHECKOUT_SESSION_ID}`,
      cancel_url: `${process.env.FRONTEND_URL}/pricing`,
    });
  }

  constructEvent(payload: Buffer, signature: string) {
    const secret = this.configService.get<string>('STRIPE_WEBHOOK_SECRET')!;
    return this.stripe.webhooks.constructEvent(payload, signature, secret);
  }
}
Step C: Controller and Webhook Handling
Create endpoints for session creation and incoming webhooks:
// src/stripe/stripe.controller.ts
import {
  Controller,
  Post,
  Body,
  Headers,
  Req,
  BadRequestException,
  RawBodyRequest,
} from '@nestjs/common';
import { Request } from 'express';
import { StripeService } from './stripe.service';

@Controller('stripe')
export class StripeController {
  constructor(private readonly stripeService: StripeService) {}

  @Post('create-checkout-session')
  async createCheckout(@Body() body: { priceId: string; userId: string }) {
    const session = await this.stripeService.createCheckoutSession(
      body.priceId,
      body.userId,
    );
    return { url: session.url };
  }

  @Post('webhook')
  async handleWebhook(
    @Headers('stripe-signature') sig: string,
    @Req() req: RawBodyRequest<Request>,
  ) {
    if (!sig || !req.rawBody) {
      throw new BadRequestException('Missing signature or raw body');
    }

    try {
      const event = this.stripeService.constructEvent(req.rawBody, sig);

      switch (event.type) {
        case 'checkout.session.completed': {
          const session = event.data.object;
          const userId = session.client_reference_id;
          // TODO: Provision subscription/access in your database
          console.log(`Payment succeeded for user ${userId}`);
          break;
        }
        case 'customer.subscription.deleted': {
          const subscription = event.data.object;
          // TODO: Revoke access in your database
          break;
        }
      }

      return { received: true };
    } catch (err: any) {
      throw new BadRequestException(`Webhook Error: ${err.message}`);
    }
  }
}
3. Next.js Integration (Frontend)
In your Next.js frontend (App Router), create a component that sends the pricing selection to NestJS and redirects the user to the returned Stripe Checkout URL.
// app/pricing/page.tsx
'use client';

import { useState } from 'react';

export default function PricingPage() {
  const [loading, setLoading] = useState(false);

  const handleSubscribe = async (priceId: string) => {
    setLoading(true);

    try {
      const res = await fetch('http://localhost:3001/stripe/create-checkout-session', {
        method: 'POST',
        headers: { 'Content-Type': 'application/json' },
        body: JSON.stringify({
          priceId,
          userId: 'usr_12345', // Fetch dynamically from auth state
        }),
      });

      const data = await res.json();

      if (data.url) {
        window.location.href = data.url; // Redirect to Hosted Stripe Checkout
      }
    } catch (err) {
      console.error('Checkout error:', err);
    } finally {
      setLoading(false);
    }
  };

  return (
    <div className="max-w-4xl mx-auto py-12 px-4 text-center">
      <h1 className="text-3xl font-bold mb-6">Choose a Plan</h1>
      <div className="border p-6 rounded-lg shadow-sm max-w-sm mx-auto">
        <h2 className="text-xl font-semibold">Pro Plan</h2>
        <p className="text-2xl font-bold my-4">$19 / month</p>
        <button
          onClick={() => handleSubscribe('price_1234567890')}
          disabled={loading}
          className="w-full bg-blue-600 text-white py-2 rounded-md hover:bg-blue-700 disabled:opacity-50"
        >
          {loading ? 'Redirecting...' : 'Subscribe Now'}
        </button>
      </div>
    </div>
  );
}
4. Local Testing Workflow
To test webhooks locally without exposing your local NestJS server to the public internet:
Install and authenticate the Stripe CLI:
stripe login2. Forward events to NestJS:
stripe listen --forward-to localhost:3001/stripe/webhookCopy the printed whsec... signing secret into your NestJS .env file as STRIPEWEBHOOK_SECRET.
3. Trigger test events:
stripe trigger checkout.session.completedProduction Checklist
Idempotency: Always check whether a Stripe event ID has already been processed before mutating the database state to prevent duplicate operations caused by webhook retries.
Security: Keep STRIPE_SECRET_KEY strictly inside the NestJS server environment. Never share API keys with the React bundle.
Return 200 Quickly: Acknowledge webhook receipts promptly. For time-consuming background jobs (e.g., sending emails or generating PDFs), queue a background task rather than delaying the response.
Comments (0)
Loading comments...